Table of Contents
Sink Parts Diagram: A Comprehensive Guide
Having a deep understanding of the various components of a sink is crucial for effective maintenance and troubleshooting. This knowledge empowers you to identify issues, perform basic repairs, and make informed decisions when seeking professional assistance. In this comprehensive guide, we will delve into the intricacies of sink parts through an informative sink parts diagram. By familiarizing yourself with these components, you can ensure the optimal functionality and longevity of your sink.
It’s important to approach sink repairs responsibly, especially when dealing with complex issues. For intricate repairs or installations, consider hiring Lifetime plumbing, your professional plumbers Chicago. Our expertise and experience can provide valuable support for ensuring the proper functioning of your sink. With this guide, you’ll be equipped with the knowledge needed to engage with professionals effectively and understand the work involved in maintaining your sink.
1. Sink Drain Parts
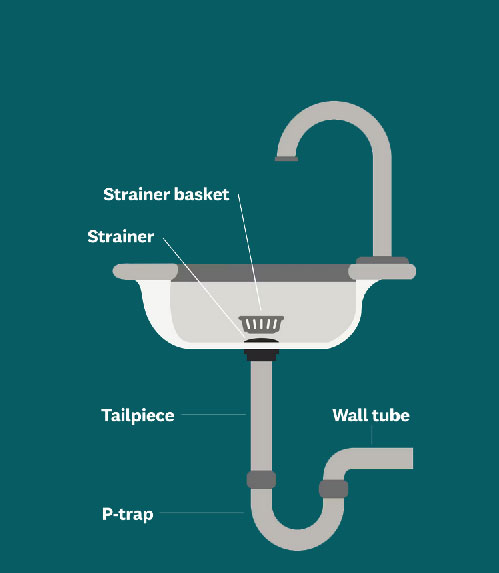
One of the essential parts of a sink is the drain system, which includes components such as the strainer basket, strainer flange, and waste arm. Understanding these interconnected parts and their functions is crucial for maintaining a properly functioning sink and preventing common problems that can arise.
2.1 Strainer Basket, Strainer Flange, and Tailpiece
The strainer basket, strainer flange, and waste arm make up the main components of the sink drain system. Each component serves a specific function in ensuring proper drainage and preventing clogs.
Strainer Basket
The strainer basket is the part that sits inside the drain opening in the sink basin. Its primary function is to catch solid debris such as food particles or hair to prevent them from clogging the plumbing system. The basket is typically made of stainless steel or plastic and features small holes or perforations that allow water to flow through while capturing larger particles.
Strainer
The strainer is the part that connects to the bottom of the sink basin and holds the strainer basket in place. It provides a seal between the sink surface and the drain pipe, preventing leaks. It is crucial to ensure a good seal between the strainer flange and the sink surface to avoid any water leakage.
Tailpiece
The waste arm, also known as the waste arm , connects to the strainer and directs water from the strainer basket down into the P-trap or directly into the drain pipe. It is usually adjustable in length to accommodate different sink configurations.
Installation Guidelines
When it comes to installation, proper guidelines should be followed to ensure optimal performance.
Installing the Strainer Basket
To install a new strainer basket, follow these steps:
- Apply plumber’s putty or silicone sealant around the underside of the strainer .
- Insert the strainer basket into the drain opening from above the sink basin.
- From underneath the sink, screw on the strainer until it is tightly secured against the sink surface.
- Wipe off any excess putty or sealant.
Ensuring a Good Seal
A good seal between the strainer flange and the sink surface is crucial to prevent leaks. If you notice any water leakage around the strainer, follow these steps to improve the seal:
- Remove the strainer basket by unscrewing it from below.
- Clean any old putty or sealant residue from both the sink surface and the strainer.
- Apply a fresh layer of plumber’s putty or silicone sealant to create a new seal.
- Reinstall the strainer basket following the previous installation steps.
By following these guidelines, you can ensure that your sink’s drain system operates smoothly without any leaks or blockages.
How to Unclog a Sink with a Strainer Basket
However, if you encounter a clogged kitchen sink with a strainer basket, there are a few steps you can take to unclog your kitchen sink:
- Plunging: Use a plunger specifically designed for sinks and place it over the drain opening. Create a tight seal and push up and down rapidly to dislodge any debris causing the clog.
- Using a Drain Snake: Insert a flexible drain snake into the drain opening and twist it clockwise or counterclockwise while pushing it further into the pipe. This action helps break up and remove clogs. Read this article if you want to find out more about how to use a plumbing snake.
Remember that regular maintenance is essential for keeping your sink drain components in good condition:
- Clean your strainer basket regularly by removing any trapped debris
- Inspect its sealing periodically to ensure there are no leaks
By taking these simple steps, you can maintain a functional and trouble-free sink drain system.
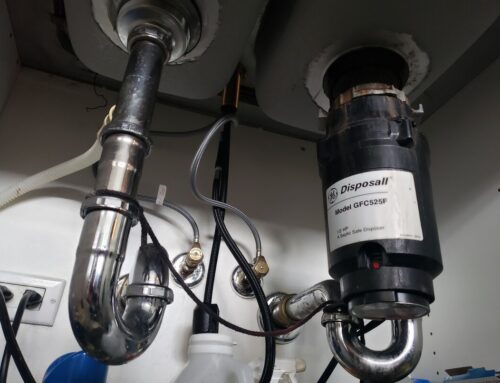
2.2 P-Trap
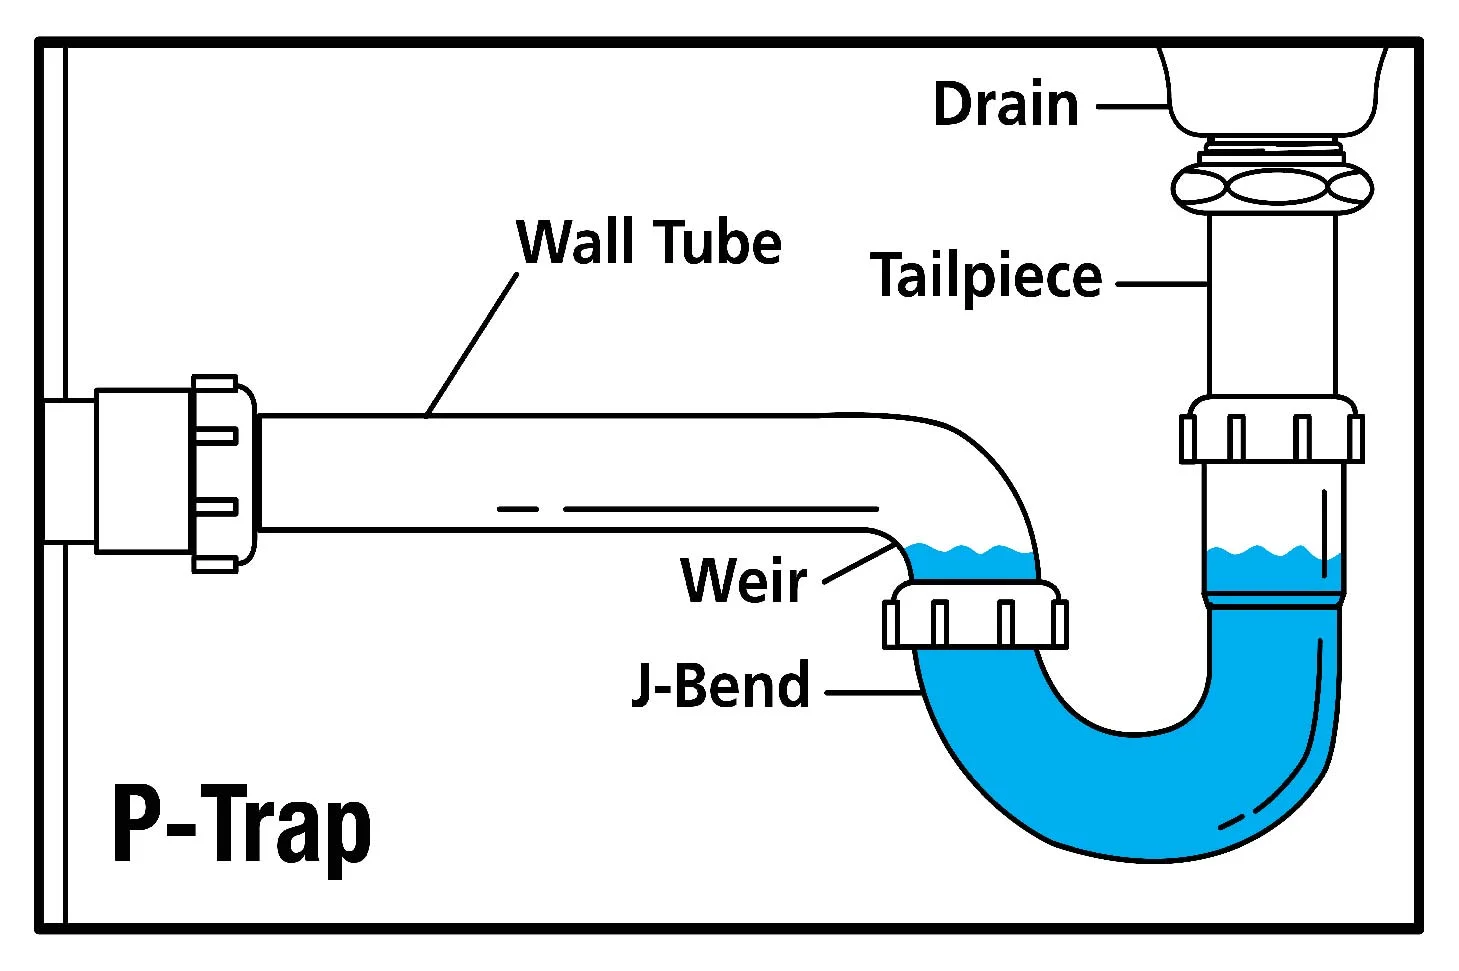
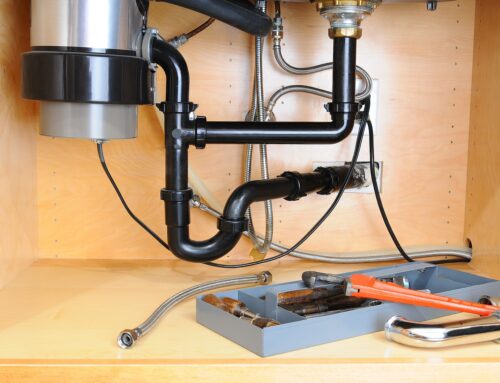
In the world of plumbing, the P-trap is an essential component of a sink drain system. Its main job is to prevent sewer gases from entering your home and maintain the indoor air quality. The name “P-trap” comes from its shape, which resembles the letter “P”.
What Does a P-Trap Do?
The primary function of a P-trap is to create a water seal that blocks the passage of sewer gases into your living space. It accomplishes this by holding a small amount of water in its curved section. This water barrier effectively blocks any odors from traveling back up through the drain and into your home.
Understanding the Parts of a P-Trap
A typical P-trap consists of several key elements:
- Strainer Basket: This is the topmost part of the P-trap that catches larger debris like food scraps or hair to prevent them from clogging the drain.
- Strainer: Located below the strainer basket, this component helps secure the basket in place.
- Tailpiece: Also known as the Waste Arm, this horizontal pipe connects the strainer flange to the P-trap.
- P-Trap Bend: As mentioned earlier, this curved section holds water to create a barrier against sewer gases.
- Drainpipe: After the curve of the P-trap, there is a vertical pipe known as the drainpipe, which connects to your home’s main sewer line.
How to Troubleshoot Common Issues with a P-Trap
Despite its importance, a P-trap can sometimes encounter problems that affect its functionality. Here are two common issues and their troubleshooting methods:
1. Foul Odors
If you notice unpleasant smells coming from your sink, it’s likely that there’s a buildup of organic matter or debris in your P-trap. To remedy this, you can try the following steps:
- Carefully remove the strainer basket.
- Use a small brush or wire to clean any visible gunk or residue.
- Flush the P-trap with hot water to dislodge and flush away any remaining debris.
Find out more about How to Remove Foul Bathroom Odors.
2. Blockages
A clogged P-trap can cause water to drain slowly or not at all. Here’s what you can do to clear the blockage:
- Place a bucket or container beneath the P-trap to catch any water that may spill out.
- Loosen the slip nuts on both ends of the P-trap using pliers or a wrench.
- Remove the P-trap and check for any obstructions.
- If you spot a blockage, use a plumbing snake or a straightened wire hanger to dislodge it.
- Reassemble the P-trap by tightening the slip nuts securely.
When Should You Replace a P-Trap? Can a P-Trap Be Installed Horizontally?
While a properly installed and maintained P-trap can last for many years, there are instances when replacement is necessary. Consider replacing your P-trap if you encounter any of the following:
- Cracks or leaks in the trap itself
- Damaged or corroded pipes
- Persistent foul odors even after cleaning
Additionally, it’s worth noting that a P-trap is typically designed to be installed vertically. However, there are specialized horizontal P-traps available for specific plumbing setups where vertical installation is not feasible.
2.3 Vent Pipe and Venting System
The vent pipe and venting system play a crucial role in maintaining the proper drainage function of a sink. The vent pipe is an essential component of the plumbing system that ensures smooth water flow and prevents siphonage or airlock within the drain.
How does a sink vent work?
It works by allowing air into the plumbing system, which aids in maintaining neutral air pressure and facilitating the efficient flow of water through the drain.
Signs of a blocked vent pipe
A blocked or malfunctioning vent pipe can lead to various plumbing issues, including:
- Slow drainage: Water takes longer than usual to drain from the sink, indicating an obstruction in the vent pipe that hinders proper airflow.
- Gurgling noises: Air trapped in the plumbing system due to a blocked vent pipe can cause gurgling or bubbling sounds as water drains from the sink.
- Foul odors: A malfunctioning venting system can lead to sewer gas escaping into the living space, resulting in unpleasant odors around the sink area.
Regular inspection and maintenance of the vent pipe are essential for ensuring uninterrupted drainage and preventing potential plumbing problems. If you encounter persistent issues with sink drainage or notice any of the aforementioned signs, it is advisable to consult a professional plumber to assess and address any underlying problems with the venting system.
3. Water Supply Lines and Shut-off Valves
When it comes to the functionality of a sink, the water supply lines and shut-off valves play a crucial role. In this section, we will discuss the different components involved in the water supply system of a sink and their importance in ensuring proper water flow and control.
3.1 Flexible Braided Supply Lines
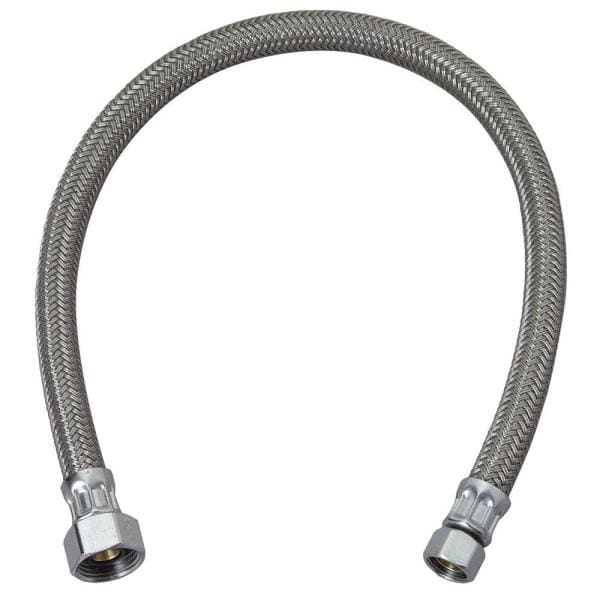
One of the key components of the water supply system is the supply line. Traditional supply lines were made of copper or galvanized steel pipes, but nowadays, flexible braided supply lines are gaining popularity due to their durability and ease of installation.
Flexible braided supply lines are made of reinforced stainless steel or nylon mesh wrapped around a flexible PVC or rubber tube. They are designed to withstand high pressure and are resistant to corrosion, making them a reliable choice for connecting the water source to the faucet.
Advantages of using flexible braided supply lines:
- Durability: Flexible braided supply lines are less prone to leaks and cracks compared to traditional copper or galvanized steel pipes. They can withstand higher water pressures without bursting, ensuring a steady and consistent water flow.
- Ease of installation: Unlike rigid pipes that require cutting, soldering, or threading, flexible braided supply lines can be easily installed by hand without any special tools. The flexibility allows for easy maneuverability, especially in tight spaces.
- Versatility: Flexible braided supply lines come in various lengths and sizes to accommodate different sink configurations. They can be used for both hot and cold water supplies, making them suitable for kitchen sinks as well as bathroom sinks.
Recommended practices for securing and replacing supply line connectors:
- Proper tightening: When connecting a flexible braided supply line to the shut-off valve or faucet, it is important to ensure a secure connection. Use an adjustable wrench or pliers to tighten the connector firmly but avoid over-tightening, as it may cause damage or leaks.
- Regular inspection: Periodically check the supply line connectors for any signs of wear or corrosion. If you notice any cracks, leaks, or damaged fittings, it is recommended to replace the supply line immediately to prevent water damage.
- Replacement frequency: While flexible braided supply lines are durable, they are not meant to last forever. It is generally recommended to replace them every 5-10 years or sooner if there are visible signs of deterioration. Regular replacement helps maintain the integrity of the water supply system and reduces the risk of leaks.
How long do supply lines last? Can you reuse a compression fitting?
- Supply line lifespan: The lifespan of a flexible braided supply line depends on various factors such as water quality, usage frequency, and maintenance. On average, they can last anywhere from 5 to 10 years. However, it is important to regularly inspect them for signs of wear and replace them as needed.
- Reusing compression fittings: Compression fittings are commonly used to connect flexible braided supply lines to shut-off valves or faucets. While it may be tempting to reuse these fittings when replacing the supply line, it is generally recommended to use new fittings for a secure and leak-free connection. Reusing old compression fittings may result in improper sealing and potential leaks.
By understanding the importance of flexible braided supply lines and following recommended practices for their installation and maintenance, you can ensure a reliable and efficient water supply system for your sink.
3.2 Compression vs. Quarter-Turn Shut-off Valves
Water Supply Lines and Shut-off Valves
The water supply lines and shut-off valves play a crucial role in providing water to the sink and controlling its flow. Regular inspection and maintenance of these components are necessary to prevent leaks and water damage.
Differences Between Compression and Quarter-Turn Shut-off Valves
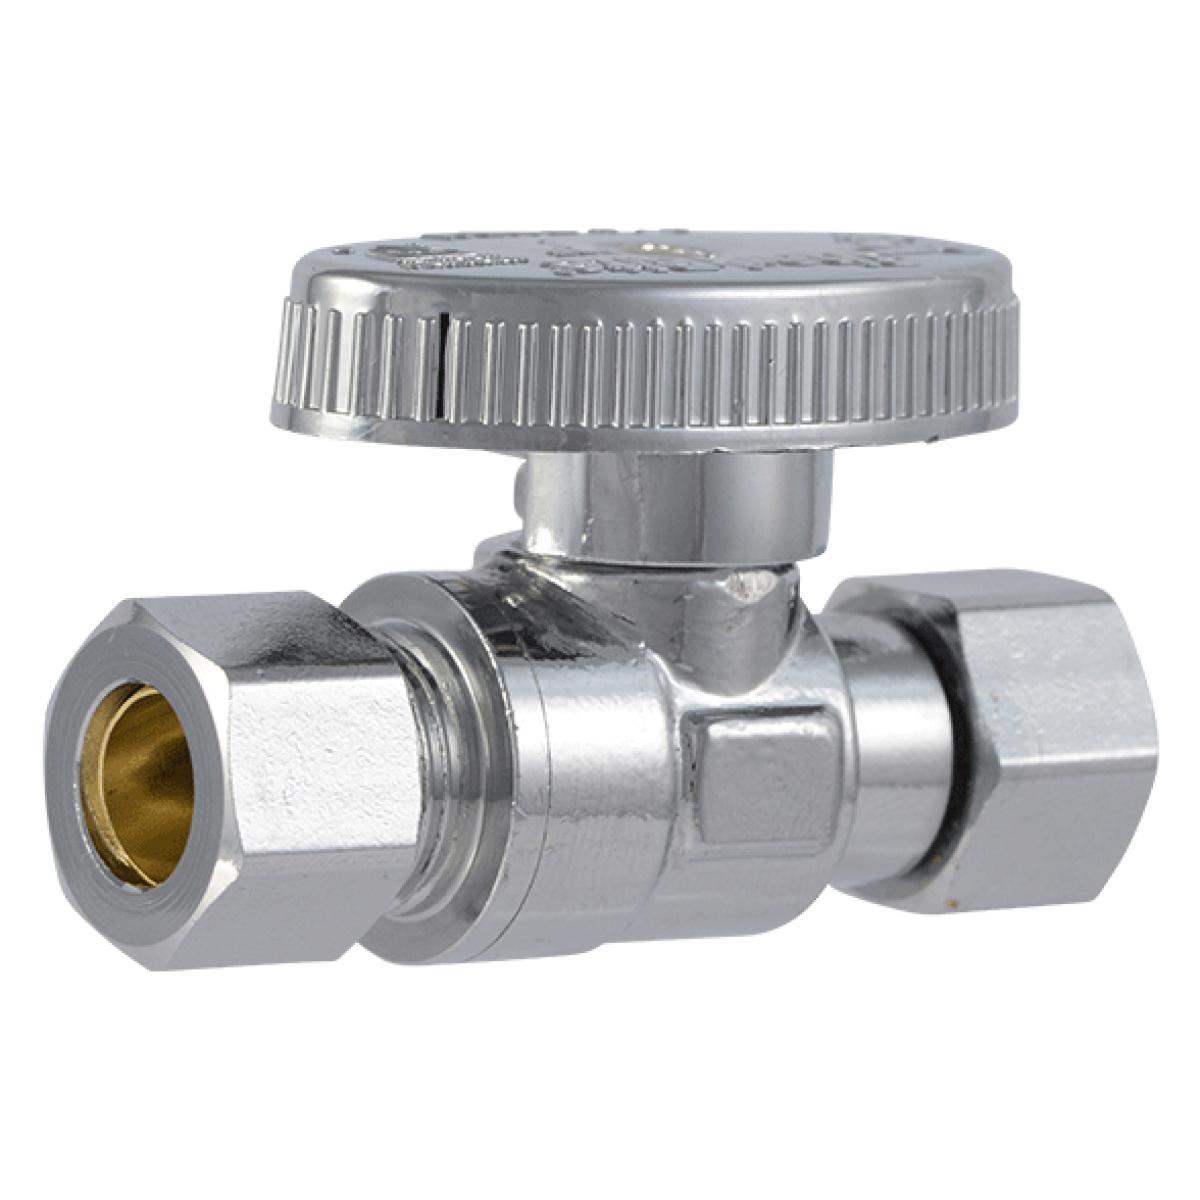
Compression Shut-off Valve:
- These valves require multiple turns to fully open or close the water flow.
- They are commonly used in older plumbing systems.
- The compression design involves a rubber washer that can degrade over time, leading to potential leaks.
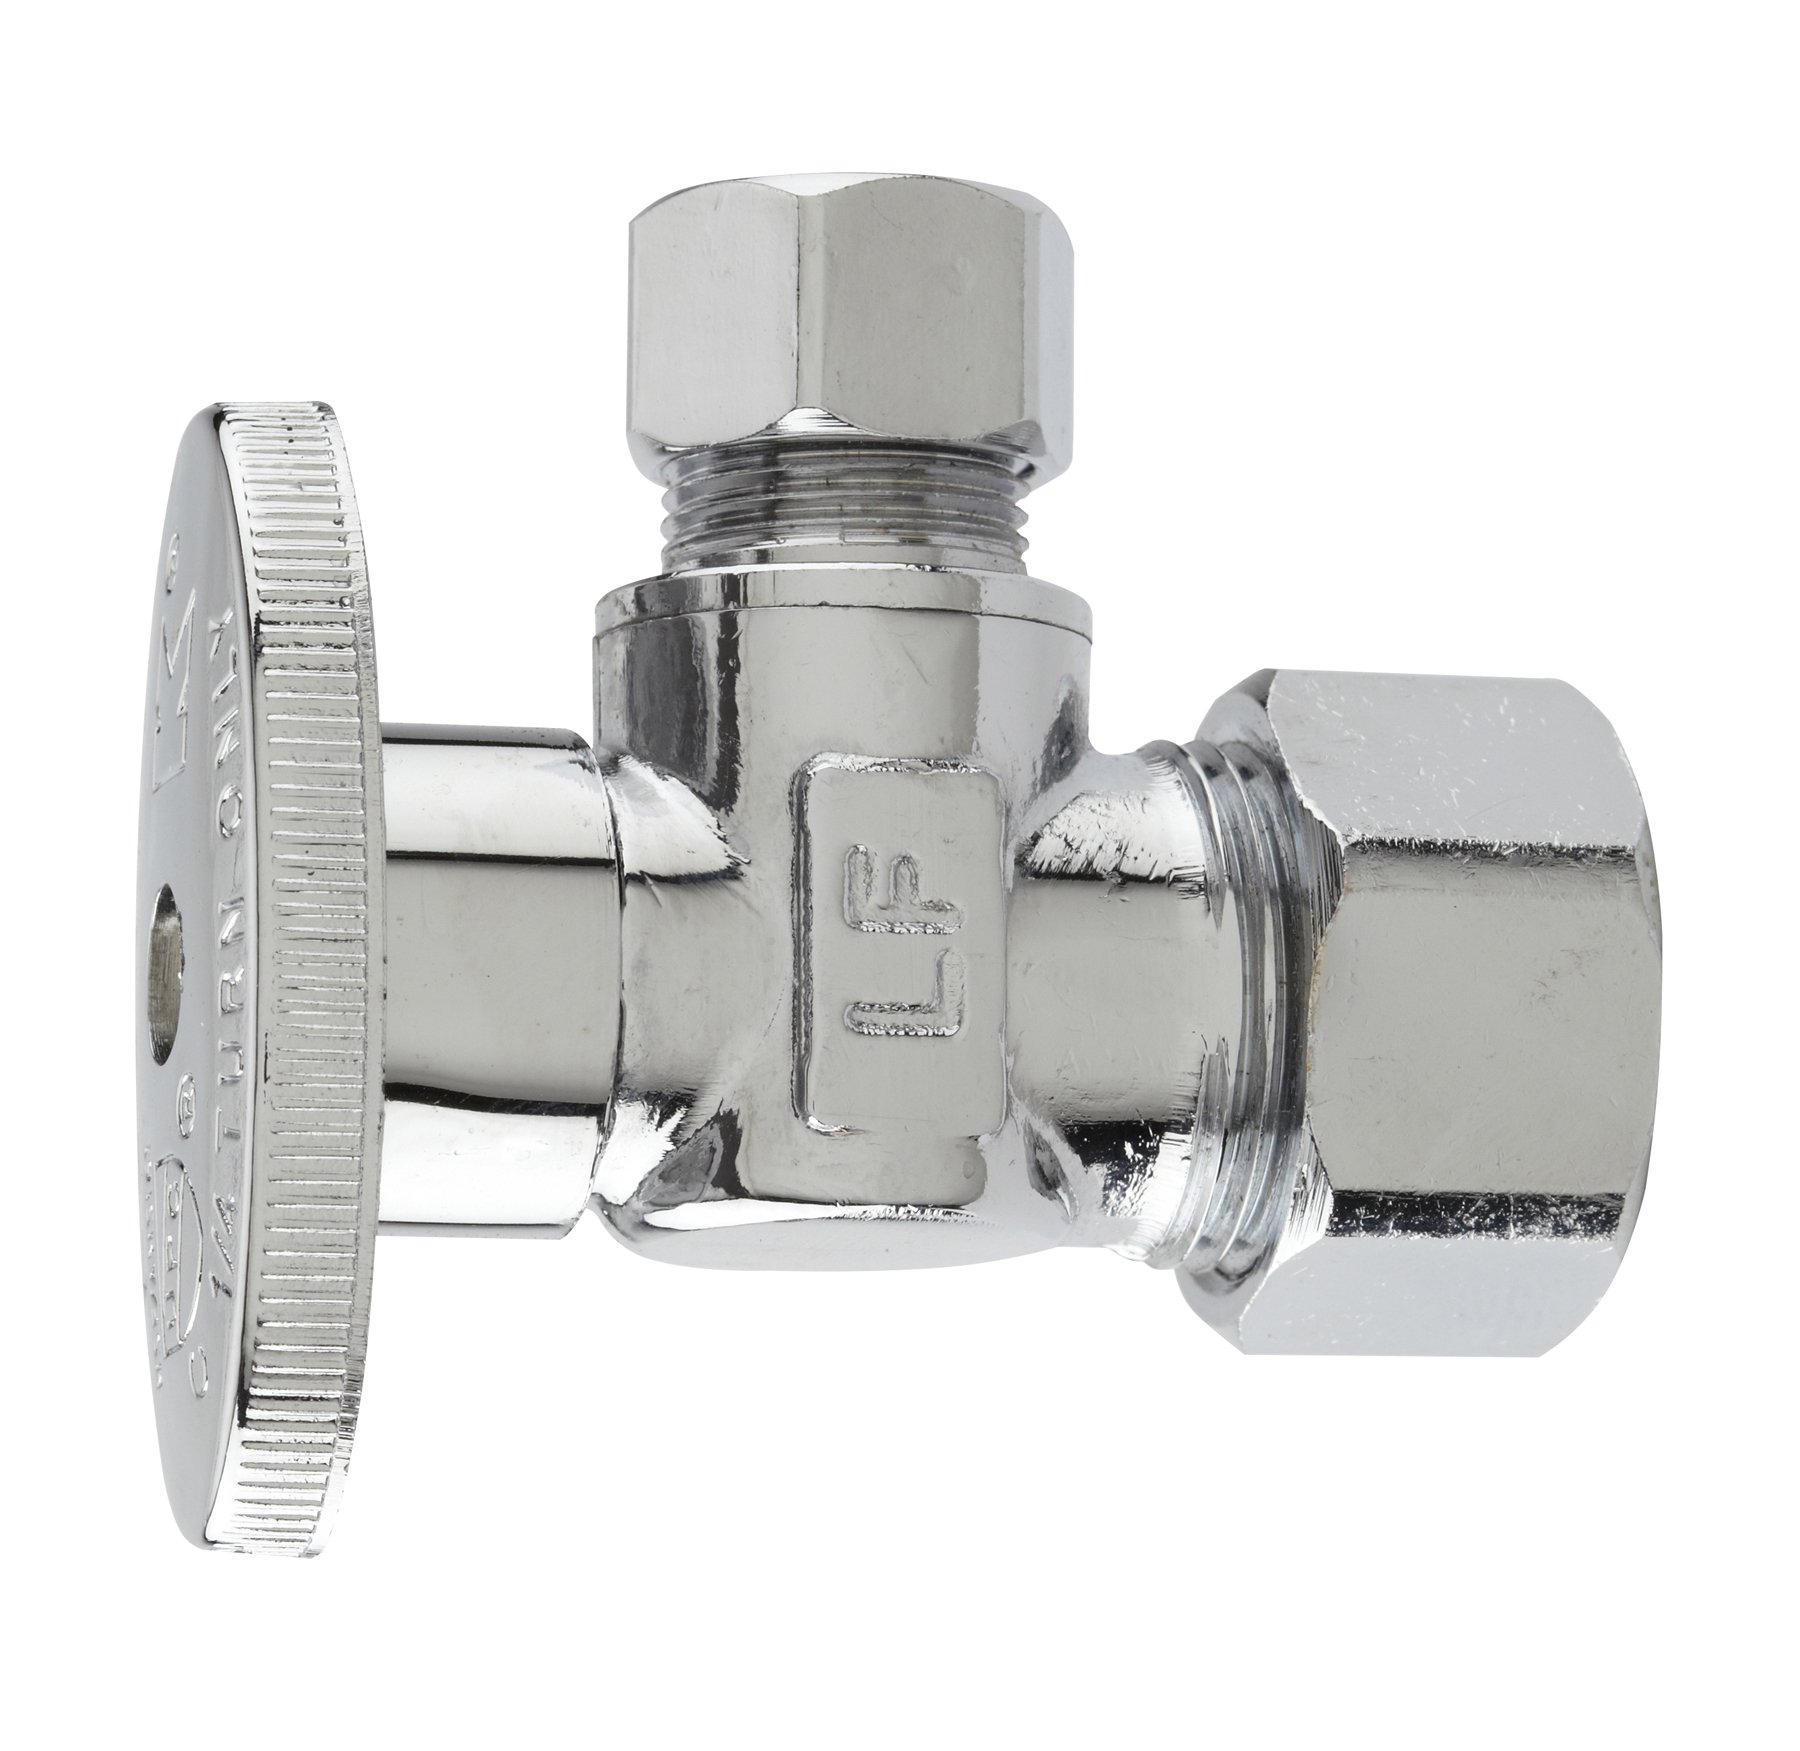
Quarter-Turn Shut-off Valve:
- These valves only require a 90-degree turn of the handle to stop or allow the water flow.
- They are known for their quick and easy operation.
- The quarter-turn mechanism reduces the risk of wear and tear, offering greater reliability.
Repairing or Replacing a Faulty Shut-off Valve
When dealing with a faulty shut-off valve, follow these steps for repair or replacement:
- Assessment: Identify the type of shut-off valve (compression or quarter-turn) and the nature of the issue.
- Gathering Materials: Prepare the necessary tools and replacement parts, such as new washers or a complete valve assembly.
- Shutting off Water: Turn off the main water supply before working on the valve to prevent any potential flooding.
- Disassembly: Carefully disassemble the valve, paying attention to the arrangement of all components.
- Replacement or Repair: Depending on the issue, either replace worn-out components or install a new shut-off valve.
- Testing: Turn the water supply back on and check for any leaks or irregularities in the valve’s operation.
Are All Shut-off Valves Standardized in Size?
Shut-off valves are not standardized in size, which is important to keep in mind when repairing or replacing them. It’s essential to ensure that the new valve or replacement components match the specific dimensions and threading of the existing plumbing system.
By understanding the differences between compression and quarter-turn shut-off valves, you can make informed decisions when it comes to maintaining or upgrading your sink’s water control components. Regular maintenance and prompt repairs will help ensure efficient water flow and prevent potential issues such as leaks or malfunctions.
2. Faucet Components
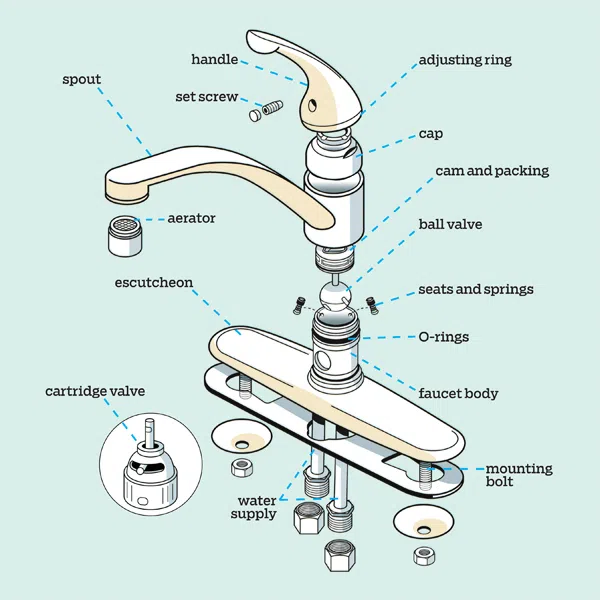
A faucet is one of the most essential components of a sink, allowing you to control the water flow and temperature. Understanding the different parts of a faucet can help you troubleshoot and maintain it effectively. In this section, we will explore the various components of a faucet in detail.
1.1 Faucet Body
The faucet body is the main housing unit of a faucet, connecting it to the sink or countertop. It houses the internal mechanisms that control water flow and temperature. The durability of the faucet body is crucial for long-lasting performance. Here are some key points about the faucet body:
- Materials: Faucet bodies are commonly made from brass, stainless steel, or zinc alloy. Brass is highly durable and resistant to corrosion, making it an excellent choice for faucets.
- Types and Styles: There are several types and styles of faucet bodies available in the market, including single-hole, widespread, and wall-mounted faucets. Each type has its own installation requirements and aesthetic appeal.
When choosing a faucet body, consider factors such as your sink design, functionality preferences, and budget. Additionally, ensure that the faucet body has a solid construction with quality materials to ensure its longevity.
1.2 Faucet Lever
Faucets are an essential part of any sink, and understanding their components is crucial for diagnosing and fixing common issues. One important element of a faucet is the faucet lever, which plays a key role in controlling the water flow and temperature.
The faucet lever, also known as the handle or knob, is used to adjust the water flow and temperature by turning it in different directions. Here are some key points to consider about faucet levers:
Functionality and Operation
The faucet lever is responsible for controlling the flow of water from the faucet. By moving the lever up or down, you can increase or decrease the water flow. Similarly, rotating the lever to the left or right controls the temperature, allowing you to achieve your desired hot or cold water mix.
Single-handle vs. Double-handle
Faucet levers come in two main designs: single-handle and double-handle.
- Single-handle faucets have a lever that controls both the water flow and temperature in one motion. They are popular for their ease of use and sleek design, making them a common choice for modern kitchens and bathrooms. Single-handle faucets offer convenience and save space on the sink deck.
- Double-handle faucets have separate levers for hot and cold water control. They provide precise temperature adjustment but require more space on the sink deck. Double-handle faucets are often found in traditional or vintage-style kitchens and bathrooms.
Advantages of Lever-style Faucets
Faucet levers offer several advantages over other types of faucet controls:
- Ease of Use: Lever-style faucets are generally easier to operate, especially for individuals with limited hand mobility or strength.
- Enhanced Precision: Lever controls allow for more precise control over water flow and temperature adjustments.
- Modern Aesthetic: Lever-style faucets often have a sleek and contemporary look, adding a touch of modernity to your kitchen or bathroom decor.
Addressing Common Issues
Occasionally, you may encounter problems with your faucet lever. One common issue is a stiff or hard-to-turn lever. This can be caused by mineral buildup or a worn-out cartridge. Regular cleaning and maintenance can help prevent this issue. If the problem persists, it may be necessary to replace the cartridge.
Understanding the functionality and different types of faucet levers is essential for selecting the right faucet for your sink and troubleshooting any issues that may arise. Whether you prefer the convenience of a single-handle lever or the classic charm of a double-handle design, choosing the right faucet lever can enhance both the aesthetics and functionality of your sink.
1.3 Spout and Spout Assembly
The spout is an important part of a sink, both in terms of how it looks and how it works. It’s the part that water comes out of and goes into the sink. Let’s take a closer look at the different types of spouts you can choose from and learn how to install one correctly.
Types of Spouts
There are a few different types of spouts you can find, each with its own design and function. Here are some common ones:
- Arched Spouts: These spouts have a high curve that makes it easy to fill up big pots and pans, which is great for kitchens with deep sinks.
- Goose-Neck Spouts: These spouts have a curved shape that looks like a goose’s neck. They give you plenty of space between the spout and the sink, so you can wash larger things more easily.
- Straight Spouts: Just like the name says, these spouts are straight without any curves. You’ll usually find them in bathrooms and utility sinks.
- Pull-Down Spouts: This type of spout has a sprayer head attached to it, so you can move it around and point the water wherever you need it. Pulling down on the sprayer head lets you reach different parts of the sink without any trouble.
Installation Guide
Putting in a new spout assembly isn’t too hard, as long as you pay attention to what you’re doing. Follow these steps to get it done right:
- Attach the spout assembly to the faucet body using a baseplate, mounting nut, and rubber gasket.
- Put the baseplate over the holes on top of the sink.
- Slide the mounting nut under the sink and tighten it up so the baseplate stays in place.
- Make sure the rubber gasket is between the baseplate and the sink, so water can’t leak out.
- Connect the water supply lines to the right spots on the spout assembly and tighten them up well.
- Turn the water back on and check for any leaks around the spout assembly. If you see any, try tightening things up a little more or replacing parts that aren’t working right.
Common Issues and Solutions
Sometimes things go wrong with your spout assembly, but there are usually ways to fix them. Here are a couple of common problems and what you can do about them:
- Leaking Spout Assembly: If water is coming out where it shouldn’t be, there might be a loose connection or a worn-out rubber gasket. Try tightening everything up and replacing the gasket if you need to.
- Dripping Spout: If your spout keeps dripping even when it’s turned off, there might be a problem with the cartridge or valve inside the faucet body. You might want to think about getting those parts replaced.
Advantages of Pull-Down Spouts
Pull-down spouts have become really popular in kitchens these days, and it’s easy to see why. They offer a few advantages that make them stand out:
- Flexibility: Being able to pull the sprayer head down and move it around helps you clean up your sink more efficiently.
- Convenience: A lot of pull-down spouts have different spray settings you can choose from, like a regular flow or a stronger spray. That gives you more options for how you want the water to come out.
- Saving Space: With a pull-down spout, you don’t need a separate sprayer attachment taking up room on your sink.
Understanding how all the parts of your sink faucet fit together, including the spout and spout assembly, is important if you want to be able to take care of any issues that come up. When you know what everything does and how it works, you can figure out what needs fixing and get it done right.
Next, we’ll move on to another important part of a sink: the aerator.
(Note: If you’re not sure about installing or fixing your sink faucet yourself, it’s always a good idea to get help from professionals like Lifetime Plumbing in Chicago.)
1.4 Aerator
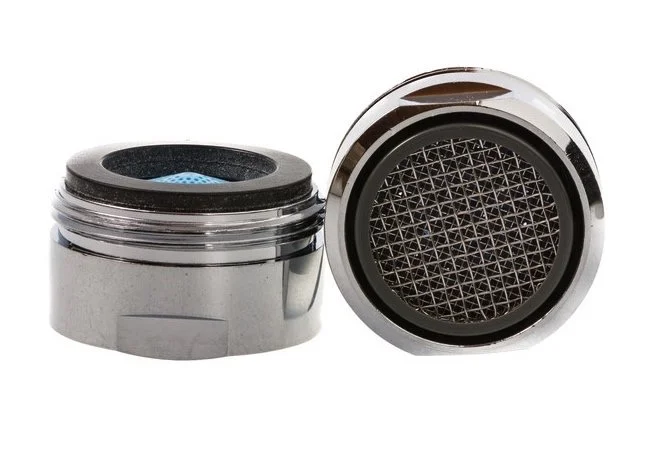
An aerator is a small but important component of a faucet that plays a significant role in maintaining water efficiency and reducing splashing in the sink. It is located at the end of the faucet spout and consists of a mesh screen or disk with tiny holes that control the flow of water.
Understanding the role of an aerator and its impact on water efficiency can help you make informed decisions when it comes to faucet maintenance and replacement. Regularly cleaning and replacing aerators can improve water flow, prevent clogs, and ensure optimal performance. By choosing the appropriate aerator for your faucet, you can strike a balance between conserving water and enjoying a satisfying water experience.
Key Points to Understand about Aerators:
- Water Efficiency and Splashing: The primary function of an aerator is to mix air with the water flow, creating a steady stream while reducing the overall amount of water used. By introducing air into the water stream, aerators help conserve water without compromising on performance. Additionally, the aerated flow helps prevent splashing, ensuring a smoother and more controlled water experience.
- Types of Aerators: There are different types of aerators available based on flow rate and thread size. Flow rate refers to the amount of water that flows through the faucet per minute.
- Standard aerators typically have a flow rate of around 2.2 gallons per minute (GPM).
- Low-flow aerators, on the other hand, have a reduced flow rate ranging from 0.5 to 1.5 GPM, making them more efficient in conserving water.
- Removing a Stuck Faucet Aerator: Over time, mineral deposits can accumulate within the aerator, causing it to become clogged or difficult to remove. If you encounter a stuck aerator:
- Try using pliers or an adjustable wrench to grip the aerator tightly and turn it counterclockwise.
- Applying some penetrating oil beforehand can also help loosen any stubborn buildup.
- Remember to protect the finish of your faucet by wrapping a cloth around it before using tools.
- Aerator Compatibility: While many faucets come with standard-sized aerators, not all aerators are universal in size. It’s essential to check the thread size and design of your faucet before purchasing a replacement aerator.
- Common thread sizes include male (15/16 inch) and female (55/64 inch).
- Some faucets may also have unique threading, so it’s crucial to consult the manufacturer’s specifications or seek professional advice if you’re unsure.
Check this article if you want to find our more about the parts of a faucet.
Conclusion
Understanding the different parts of a sink is crucial for homeowners to effectively maintain their plumbing systems and address minor issues promptly. Familiarity with sink components empowers homeowners to take better care of their sinks and avoid costly repairs.
Remember that while having knowledge about sink parts allows for basic troubleshooting and maintenance, complex sink repairs should be left to our professionals plumbers in Chicago. Lifetime Plumbing has the expertise to handle intricate plumbing issues and ensure long-lasting solutions.

