Table of Contents
- 1 Toilet Parts Diagram: How Toilets Are Put Together
- 2 Understanding the Tank
- 3 Exploring the Bowl
- 4 Understanding the Flush Mechanism
- 5 Exploring the Fill Mechanism
- 6 Understanding the Wax Ring and Flange
- 7 Exploring Additional Components
- 8 Troubleshooting Common Toilet Issues
- 9 Maintenance and Care Tips
- 10 Conclusion
- 11 FAQ
Toilet Parts Diagram: How Toilets Are Put Together
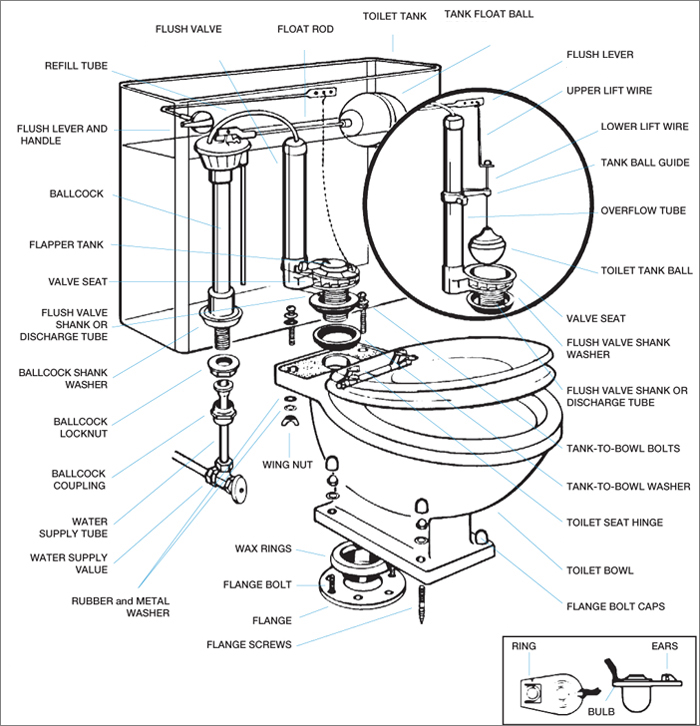
Have you ever wondered what goes on behind the scenes of a toilet? From the tank to the bowl to the wax ring, there are many components that make up a functioning toilet. Understanding how your toilet is put together can help you troubleshoot problems and perform proper maintenance.
In this section, we will provide an overview of the toilet parts diagram, exploring the various components involved in assembling a toilet. By the end of this section, you will have a better understanding of how your toilet works and the importance of proper maintenance.
Key Takeaways:
- Understanding the toilet parts diagram can help troubleshoot issues and perform maintenance.
- A toilet consists of various components, including the tank, bowl, flush and fill mechanisms, wax ring, and flange.
- Maintaining a well-functioning toilet is essential for a comfortable restroom experience.
Understanding the Tank
When it comes to understanding how toilets work, it’s essential to start with the toilet tank. The tank is a vital part of the toilet that stores water until it’s needed to flush waste down the bowl. The standard tank size is about 2 gallons, but some newer toilets offer smaller or larger tanks depending on the model.
The toilet tank is made up of several components that work together to ensure the toilet can operate efficiently. Here are the critical parts of a toilet tank:
Fill valve
This valve fills the tank with water after a flush. It’s activated by the float, which rises as the water level in the tank decreases.
Flush valve
This valve is located at the bottom of the tank and is responsible for releasing water into the bowl when you flush the toilet. When you press the flush lever, it lifts the flush valve, allowing the water to exit the tank and enter the bowl.
Flapper
The flapper is attached to the flush valve and opens and closes to allow water to enter the bowl. It ensures that the tank retains the right amount of water and that waste is flushed away properly.
Overflow tube
This tube prevents the tank from overflowing and directs excess water into the bowl. The water level in the tank should always be below the overflow tube.
Handle or lever
When you push down on the handle or lever, it lifts the flapper, and the water is released from the tank into the bowl.
Understanding how the different parts of a toilet tank work together is essential in diagnosing and repairing issues that might arise. If you’re experiencing problems with your toilet tank or any other part of your toilet, it’s important to seek assistance from a qualified plumber.
Exploring the Bowl
The toilet bowl is where the magic happens. It’s the part of the toilet that collects and flushes away the waste. Let’s take a closer look at its different components:
The Rim
The rim is the upper edge of the bowl. It’s where water from the tank flows into the bowl during a flush. The rim has small holes or nozzles, known as rim jets, which spray water around the bowl to help clean it.
The Trap
The trap is the curved section of the bowl that holds water and prevents sewer gases from entering your bathroom. When you flush, the water and waste go through the trap and into the drainpipe.
The Siphon Jets
The siphon jets are located under the rim and help to create the swirling motion of water during a flush. They also provide additional power to help remove waste from the bowl.
Together, the rim, trap, and siphon jets ensure that waste is efficiently removed from the bowl without leaving any residue behind. Understanding the different parts of a toilet bowl can help you diagnose and fix any issues that may arise.
Check this article if you want to know about how to raise water level in toilet bow.
Understanding the Flush Mechanism
The flush mechanism is responsible for initiating the flushing action.
When you press the toilet handle or lever, it lifts the flush valve, which allows water to flow from the tank into the bowl. As water enters the bowl, it creates suction that pulls waste and water down the drain.
The handle or lever attaches to a linkage that connects to the flush valve. When you lift the handle, the linkage raises the flush valve, opening the passage for water to enter the bowl.
There are two types of flush mechanisms: gravity-fed and pressure-assisted. Gravity-fed systems, the most common type, rely on the force of gravity to move water from the tank to the bowl. Pressure-assisted systems, on the other hand, use air pressure to force water into the bowl.
The flush handle or lever is typically located on the front or side of the tank. It connects to a lift arm, which then connects to the chain on the flapper. When you push the handle or lever, it lifts the lift arm, allowing the chain to pull up the flapper. The flapper then opens, allowing water to flow into the bowl and initiate the flush.
Exploring the Fill Mechanism
The fill mechanism is a critical component of any toilet. Without it, your tank would not refill with water after a flush, making your toilet unusable until it is fixed. Understanding how the fill mechanism works can help you troubleshoot issues and keep your toilet functioning correctly. In this section, we will take a closer look at the different parts of the fill mechanism, including the toilet fill valve and the toilet float.
Toilet Fill Valve
The toilet fill valve, also known as the ballcock, is responsible for refilling the toilet tank with clean water after a flush. It is typically located on the left-hand side of the tank and is connected to the water supply line. When the toilet is flushed, the fill valve opens, allowing fresh water to enter the tank and fill it up. Once the tank is full, the fill valve shuts off the water supply to prevent overflowing.
Toilet Float
The toilet float is a small, buoyant device that is attached to the fill valve. Its purpose is to tell the fill valve when to stop adding water to the tank. When the tank is empty, the float is in the down position, and the fill valve is open, allowing water to flow into the tank. As the tank fills up, the float rises with the water level. Once the water level reaches a predetermined point, the float triggers the fill valve to shut off, stopping the flow of water into the tank.
Refill Tube
In addition to the fill valve and float, there is also a refill tube that is part of the fill mechanism. The refill tube directs water from the fill valve into the overflow tube, which is located in the center of the tank. The overflow tube prevents the tank from overflowing, as any excess water will flow down the tube and into the bowl.
Understanding the fill mechanism and its different components can help you troubleshoot issues when your toilet is not functioning correctly. If you suspect there is a problem with the fill mechanism, it may be time to replace the fill valve, float, or refill tube.
Understanding the Wax Ring and Flange
When it comes to installing a toilet, the wax ring and flange are two critical components that ensure proper function and prevent leaks. Let’s take a closer look at each of these parts and their importance in the toilet assembly.
The Wax Ring
The wax ring is a circular gasket that is placed between the toilet base and the flange on the drain pipe. It creates a watertight seal that prevents sewage gases and water from leaking out of the toilet. The wax ring comes in different sizes to fit various toilet models, so it is essential to choose the correct one for your toilet.
When installing a new toilet, it is essential to make sure that the wax ring is in good condition and free of cracks or damage. If it is damaged, it should be replaced to avoid leaks and potential water damage.
The Flange
The flange is a ring-shaped fitting that is attached to the drain pipe and sits flush with the floor. It provides a secure base for the toilet to sit on and helps to distribute the weight of the toilet evenly. The flange also has holes for attaching the toilet bolts that hold the toilet base firmly in place.
Flanges come in different sizes and shapes, depending on the size and location of the drain pipe. It is essential to choose the correct flange for your toilet to ensure a tight and secure fit.
Installation Tips
When installing a toilet, it is crucial to ensure that the wax ring and flange are correctly installed to prevent leaks. Here are some installation tips:
- Firstly, make sure the flange is securely attached to the drain pipe.
- Secondly, insert the bolts into the flange before placing the wax ring on the flange.
- Next, center the wax ring on the flange and press down firmly to set it in place.
- Afterwards, carefully lower the toilet onto the flange, making sure the bolts align with the holes in the base.
- Finally, tighten the nuts onto the bolts, applying even pressure to ensure a tight seal.
By following these tips and properly installing the wax ring and flange, you can rest assured that your toilet will function correctly and avoid any messy and costly leaks.
Exploring Additional Components
Aside from the main components of a toilet, there are a few additional parts that are necessary for proper installation and function. These components include:
Component
Toilet seat
The seat is the part of the toilet that you sit on. It is typically made of plastic, wood or cushioned materials. Explore this guide for step-by-step instructions on installing a toilet seat: How to Install a Toilet Seat.
Toilet bolts
These bolts are used to attach the toilet bowl to the floor flange. They are typically made of brass or stainless steel to prevent rusting.
Gasket
The gasket is placed between the toilet bowl and the floor flange to create a watertight seal. It is typically made of wax or rubber.
When installing a new toilet, it is important to make sure all of these components are included and properly installed. Loose or damaged toilet seats, bolts, or gaskets can cause leaks or make it difficult to properly clean the toilet.
It is also important to choose a toilet seat that fits properly on the bowl and is comfortable for the user. Seats come in a variety of shapes and sizes, so be sure to choose the right one for your toilet.
Furthermore, when purchasing toilet bolts, make sure they are the correct size and length for your toilet model. A loose bolt can cause the toilet bowl to wobble, which can lead to leaks and other problems.
The gasket is a crucial component that ensures a tight seal between the toilet and the floor. If the gasket is damaged or improperly installed, it can cause leaks and water damage to the floor.
Proper installation and maintenance of these additional components can help ensure a safe, functional, and comfortable toilet.
RELATED: Types of Toilets
Troubleshooting Common Toilet Issues
While toilets are essential for our daily lives, they sometimes face common issues that can be frustrating to deal with. Fortunately, many of these problems can be solved with simple troubleshooting techniques. In this section, we’ll discuss some of the most common toilet issues and how to troubleshoot them.
Clogged Toilet
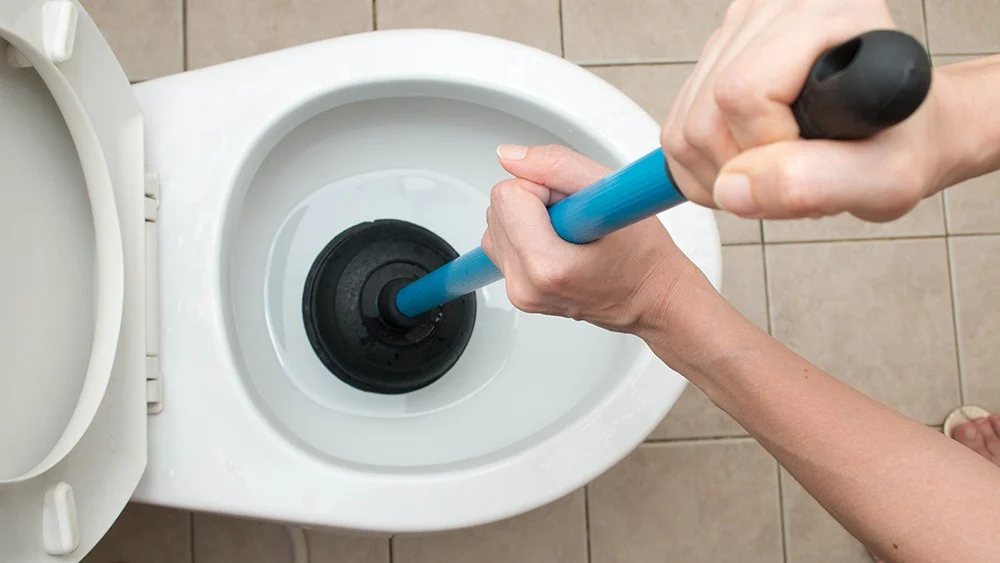
A clogged toilet is a prevalent problem that can be caused by various reasons, including flushing inappropriate materials like wipes or too much toilet paper. Initially, the first step to fix a clogged toilet is to use a plunger. If that doesn’t work, you can try using a toilet auger to remove the blockage. However, if the problem persists, it’s better to call a professional plumber.
Leaking Toilet
A leaking toilet can waste a lot of water and increase your water bill. To check if your toilet is leaking, add some food coloring to the tank and wait fifteen minutes. If the color appears in the bowl, there’s a leak. The cause of the water leak can be due to a faulty flapper, fill valve, or tank-bowl gasket. In such cases, replacing the damaged part should solve the problem.
Running Toilet
A running toilet can also waste water and escalate your water bill. The cause of a running toilet is generally a malfunctioning flapper or fill valve. First, check the flapper and ensure it’s appropriately attached, clean, and in good condition. If it is, check the fill valve and ensure that the float arm is not rubbing against any other part of the tank. If the problem persists, call a professional plumber.
Weak Flush
A weak flush can be due to a restricted water flow, a faulty flush valve, or a partially clogged trapway. To fix this, check if the water level in the tank is sufficient, and the flush valve opens properly. If that doesn’t help, try using a plunger to remove any clog in the trapway or call a professional plumber.
Ghost Flushing
Ghost flushing occurs when your toilet seems to flush on its own. It can be due to a damaged flapper, a slow leak from the tank to the bowl, or an issue with the fill valve. Check the flapper and ensure that it’s correctly attached and in good condition. If the problem persists, it’s better to call a professional plumber.
By following these simple troubleshooting techniques, you can quickly fix the most common toilet issues without the need for professional help. However, if you’re unsure about the problem’s cause or how to fix it, always seek professional help to avoid causing further damage.
Maintenance and Care Tips
Keeping your toilet in good condition is essential for maintaining a healthy and clean restroom. Regular maintenance can also help prolong the lifespan of your toilet and prevent costly repairs. Here are some toilet care tips to keep your toilet in top condition:
Clean Your Toilet Regularly
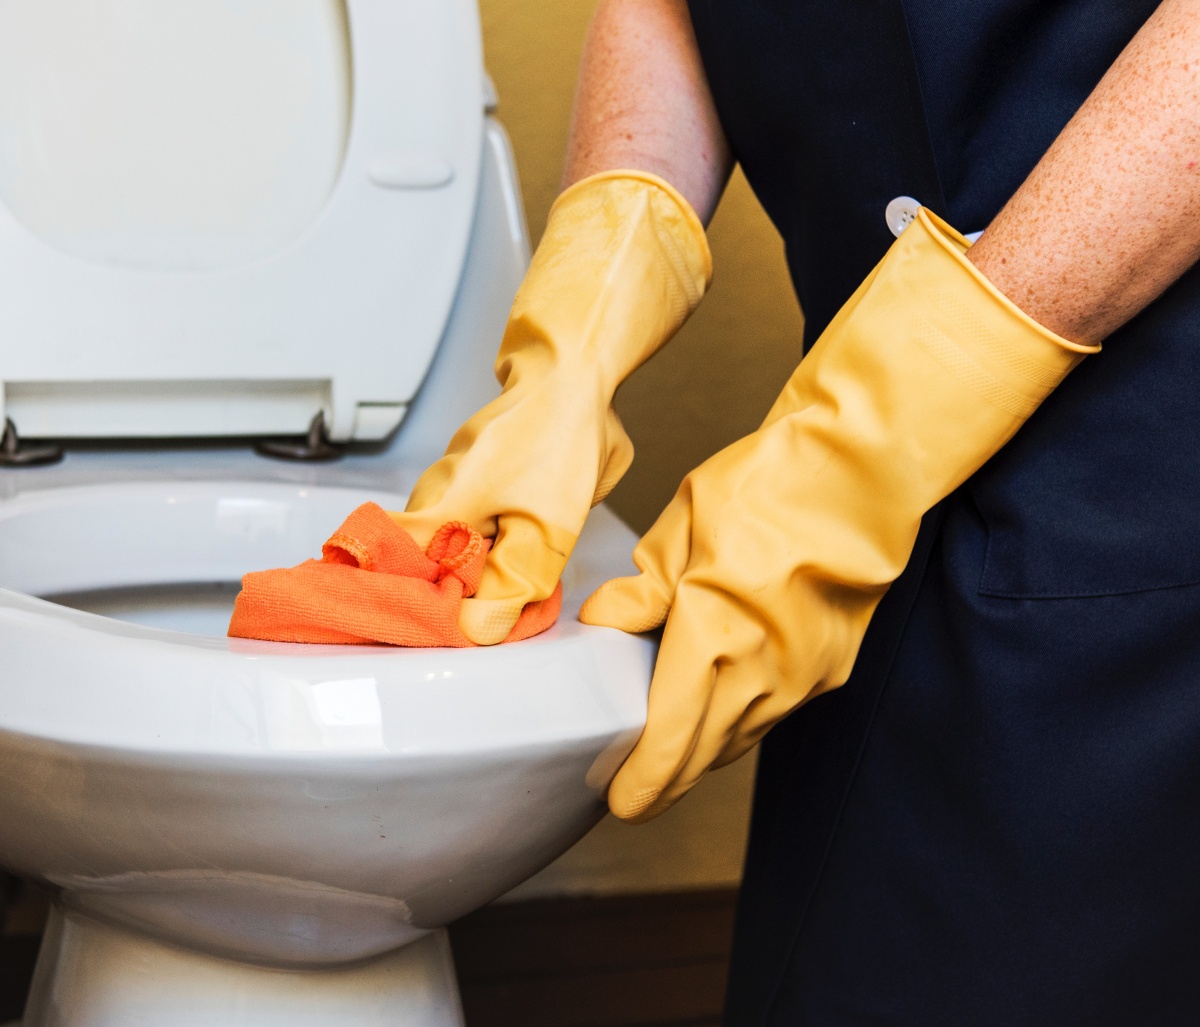
The first and most important step to maintain your toilet is to clean it regularly. Use a mild cleaning agent to wipe the exterior of the toilet and the seat. For tougher stains, use a scrub brush and a more potent cleaning agent. Avoid using abrasive cleaners or brushes that can scratch the toilet surface. Check this article to find out more about removing rust stains from toilets.
Explore the 8 Best Toilet Bowl Cleaners – effective, reliable, and ready to refresh your bathroom instantly!
Prevent Clogs
To prevent clogs, be mindful of what you flush down the toilet. Avoid flushing anything other than toilet paper and human waste. Dispose of other items like facial tissues, paper towels, or feminine hygiene products in the trash can.
Check for Leaks
Check your toilet regularly for water leaks. Leaks can be caused by various factors, such as a cracked bowl or tank, a faulty fill valve or flapper, or a loose connection between the tank and bowl. A leaking toilet can waste a significant amount of water and increase your water bill. To identify and confirm any leaks, add a few drops of food coloring to the toilet tank and wait for 10-15 minutes. If the color appears in the bowl, you have a leak.
Maintain the Components
Regular maintenance of the toilet components can help extend the lifespan of your toilet. Check the fill valve, flapper, and flush handle periodically to see if they need adjustment or replacement.
Use Proper Toilet Paper
Not all toilet paper is created equal. Cheaper, low-quality toilet paper can break apart easily and cause clogs. Use high-quality toilet paper that is designed to dissolve quickly and efficiently. Find out more about the best toilet paper for your septic tank.
Consider Professional Maintenance
If you’re not comfortable maintaining your toilet, consider hiring a professional plumber for periodic maintenance. Professional maintenance can help identify potential problems early on and prevent costly repairs down the line. For all your plumbing needs in Chicago and nearby areas, reach out to Lifetime Plumbing, your trusted licensed plumber in Chicago.
Conclusion
By understanding how a toilet is put together through our Toilet Parts Diagram, you are equipped to troubleshoot problems and perform regular maintenance on your own. Proper care of your toilet will save you time and money in the long run.
Don’t Be Afraid to DIY
When it comes to fixing common toilet issues, don’t be afraid to take matters into your own hands. With basic knowledge of the different parts and mechanisms, you can easily identify and fix many problems without the need for a plumber.
Preventative Maintenance Goes a Long Way
Regular maintenance is crucial to preventing toilet problems. Simple actions like checking for leaks and cleaning the bowl and tank can prevent major issues later on. By taking care of your toilet, you can ensure a comfortable restroom experience for years to come.
Know When to Call a Professional
While many issues can be fixed with basic knowledge and tools, there are times when it’s best to call in a professional plumber. If you encounter a problem that’s beyond your capabilities, don’t hesitate to seek professional assistance. If you reside in or near Chicago, Lifetime Plumbing is at your service. Contact us at (773) 595-1867 for comprehensive plumbing services in Chicago.
FAQ
How are toilets put together?
Toilets are assembled using various components, including the tank, bowl, flush mechanism, fill mechanism, wax ring, flange, and additional components like the toilet seat and bolts.
What are the parts of a toilet tank?
The tank of a toilet consists of several parts, such as the fill valve, flush valve, and flapper. These components work together to control the flow of water during flushing and refilling.
What are the components of a toilet bowl?
The toilet bowl is made up of different parts, including the trap, rim, and siphon jets. These components help facilitate the flushing and removal of waste.
How does the flush mechanism work?
The flush mechanism is activated by the flush handle or lever, which is connected to a linkage that opens the flush valve. This allows water from the tank to rush into the bowl, creating a flushing action.
What is the fill mechanism in a toilet?
The fill mechanism includes the fill valve, float, and refill tube. When the toilet is flushed, the fill valve opens to allow water to refill the tank. The float controls the fill valve, ensuring the tank reaches the correct water level.
More Posts You May Find Interesting
Table of Contents
- 1 Toilet Parts Diagram: How Toilets Are Put Together
- 2 Understanding the Tank
- 3 Exploring the Bowl
- 4 Understanding the Flush Mechanism
- 5 Exploring the Fill Mechanism
- 6 Understanding the Wax Ring and Flange
- 7 Exploring Additional Components
- 8 Troubleshooting Common Toilet Issues
- 9 Maintenance and Care Tips
- 10 Conclusion
- 11 FAQ

